
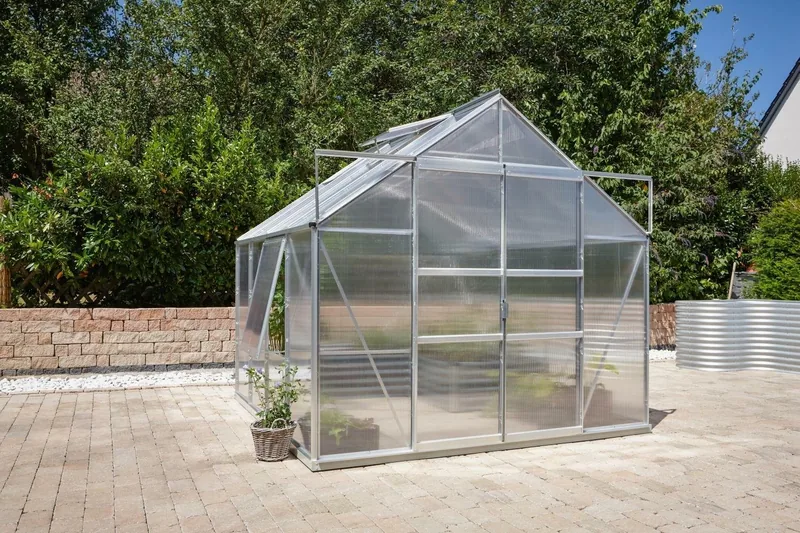


Vitavia Meridian 2 6700 Manuale
Manuale PDF · 36 Pagine
Italiano



Controllo rapido
Risposta errata, riprova.
Chatta con il manuale del tuo Vitavia Meridian 2 6700 utilizzando l'IA
Ottieni risposte istantanee dall'IA dal manuale del tuo Vitavia Meridian 2 6700
Chiedi qualsiasi cosa sul Vitavia Meridian 2 6700. Le risposte provengono da questo manuale, con le pagine di riferimento.
Meridian 2 6700 Programma di manutenzione
Lavare accuratamente con un detergente delicato. Assicurarsi che il detergente non reagisca in modo aggressivo con l'alluminio o le clip di fissaggio del vetro.
Assicurarsi che le guide superiori e inferiori delle porte siano pulite regolarmente per evitare l'accumulo di detriti.
Fai una Domanda
Consigli Meridian 2 6700?
Sì NoDomande frequenti
Necesitarás destornilladores (plano y estrella PH2), una llave de vaso de 10 mm o llave inglesa, una llave combinada, un cuchillo, una regla de medición, un nivel de burbuja y un taladro accu con par ajustable.
Questa risposta è utile?
Sí, pero debes seguir la hoja de instrucciones específica incluida con las hojas de policarbonato en lugar de la guía estándar de acristalamiento de vidrio.
Questa risposta è utile?
Sí, el invernadero siempre debe anclarse al suelo para garantizar la estabilidad, especialmente en condiciones ventosas.
Questa risposta è utile?
El par de apriete máximo para las tuercas es de 3Nm. Un apriete excesivo puede dañar los perfiles de aluminio o las roscas.
Questa risposta è utile?
Limpia regularmente las pistas superior e inferior de la puerta para evitar la acumulación de residuos, asegurando que la puerta se deslice libremente sin obstrucciones.
Questa risposta è utile?
Si faltan piezas después de desembalar, contacta inmediatamente a tu minorista para obtener un reemplazo antes de comenzar el montaje.
Questa risposta è utile?
Vantaggi e Svantaggi
Vantaggi

- Marco de aluminio durable resistente a la oxidación y corrosión
- El acristalamiento de 4 mm proporciona un excelente aislamiento térmico para las plantas
- El sistema de puerta corredera suave permite un fácil acceso al interior
- Diseño modular disponible en varios tamaños para adaptarse a diversos diseños de jardín
- Instrucciones de montaje completas incluidas en varios idiomas
Svantaggi

- Requiere una base perfectamente nivelada y cuadrada para una alineación adecuada
- El material de sellado de silicona no está incluido en el paquete estándar
- La carga pesada de nieve requiere eliminación manual para prevenir tensión estructural
- El montaje debe ser realizado por al menos dos personas por seguridad
- Los paneles de vidrio requieren manipulación cuidadosa y precauciones de seguridad específicas
Prodotto Specifiche
Vetratura
Policarbonato 4mm (pannelli a camera d'aria)
Telaio
Alluminio
Colore
argento
Superficie
6,67 mq
Caratteristiche
2 lucernari sul tetto, 1 finestra battente, grondaia, serrabile
Porta
Doppia porta scorrevole
Dimensioni (LxPxA)
8465x8432x7612 mm
Descrizione del prodotto Descrizione
Descubre la Vitavia Meridian 2 6700 HKP 4mm Greenhouse alu
Crear un santuario para tus plantas nunca ha sido tan fácil con la Vitavia Meridian 2 6700 HKP 4mm Greenhouse alu. Esta estructura robusta está diseñada para proporcionar el entorno perfecto para los amantes de la jardinería que exigen durabilidad y estilo. El invernadero cuenta con un marco de aluminio elegante que garantiza longevidad mientras resiste la corrosión por los elementos. Con un acristalamiento de 4 mm de grosor, este modelo ofrece excelentes propiedades de aislamiento, manteniendo tus plantas calientes durante las noches frías y protegiéndolas de vientos fuertes.
El montaje de la Vitavia Meridian 2 es sencillo si sigues el manual detallado proporcionado. El kit incluye todos los componentes necesarios para los tamaños 6700, 8300, 9900 y 11500, permitiéndote personalizar la huella para adaptarla a tu espacio de jardín. El diseño incorpora puertas correderas que se deslizan suavemente en pistas dedicadas, facilitando el acceso a tus plantas incluso en espacios reducidos. La seguridad es una prioridad, por lo que las instrucciones enfatizan el uso de equipo de protección durante el montaje y el manejo de hojas de vidrio o policarbonato con cuidado.
El mantenimiento de tu nuevo invernadero es mínimo pero efectivo. La limpieza regular con un detergente suave mantiene el marco de aluminio y los paneles de vidrio impecables sin dañar los materiales. Es crucial mantener las pistas de la puerta libres de residuos para asegurar que el mecanismo de deslizamiento permanezca libre de fricción. Para aquellos que viven en áreas con mucha nevada, la construcción sólida soporta cargas de techo, aunque se recomienda limpiar la nieve periódicamente para evitar tensiones en la estructura.
La Vitavia Meridian 2 6700 HKP 4mm Greenhouse alu es más que un refugio; es una herramienta para cultivar. Ya sea que estés cultivando flores exóticas o sembrando semillas para la cosecha de primavera, este invernadero proporciona la estabilidad y el control climático necesarios para el éxito. Recuerda anclar la unidad firmemente al suelo para resistir ráfagas fuertes de viento. Siguiendo las pautas de selección del sitio y eligiendo una ubicación soleada y protegida, maximizas el potencial de tu jardín interior.
Notas importantes
- Siempre verifica la lista de piezas antes de comenzar el montaje para asegurarte de que no falte nada.
- No aprietes demasiado los pernos; se recomienda un par máximo de 3Nm para evitar dañar las roscas.
- Sella los bordes con silicona neutra si deseas un sellado completamente hermético, aunque esto es opcional.
- Guarda el manual de forma segura para futuras referencias sobre repuestos.
Cerca di 67.706 Manuali online


Digita il marchio o il modello