Manual.ly Logo

ATEN CS52DP Manuale

0,0 · 0 Valutazioni

Manuale PDF · 2 Pagine

Italiano

M: QW-35-FL
pagina

/ 2

Loading...
db48b9d97d430fbbbd6262cde14dc087e1ef page 1
USB
DP
11
Audio
Audio
or
2a
USB
3
DP
Audio
USB
USB
Audio
Audio
Audio
USB-C Device
Keyboard
Mouse
Monitor
Speakers
Mic
Power Adapter
2b
133
2
14
15
16
17
1
1
A
Hardware Review
B
Installation
2-Port USB-C DisplayPort Hybrid Cable
KVM Switch
Quick Start Guide
CS52DP
Support and Documentation Notice
All information, documentation, fi rmware,
software utilities, and specifi cations contained in
this package are subject to change without prior
notifi cation by the manufacturer.
To reduce the environmental impact of our
products, ATEN documentation and software can
be found online at
http://www.aten.com/download/
Technical Support
www.aten.com/support
Scan for more information
Package Contents
1 CS52DP 2-Port USB-C DisplayPort
Hybrid Cable KVM Switch
1 user instructions
ATEN Website
To prevent damage to your installation from power
surges or static electricity, it is important that all
connected devices are properly grounded.
© Copyright 2022 ATEN
®
International Co. Ltd.
ATEN and the ATEN logo are registered trademarks of ATEN International Co., Ltd.
All rights reserved. All other trademarks are the property of their respective owners.
Part No. PAPE-1223-W60G Released:02/2022
Side View
Top View
2-портовый KVM-переключатель CS52DP с гибридными кабелями USB-C/DisplayPort
A
Обзор оборудования
Вид сбоку
1
Порт питания Micro USB-B
Вид сверху
1
Индикаторы портов
2
Консольные порты
3
Пульт удаленного
переключения порта
4
Разъем USB-A
B
Установка
1
Подсоедините USB-клавиатуру, USB-мышь, монитор с DisplayPort, микрофон
и динамики к соответствующим портам на CS52DP.
Примечание: Порты USB-A могут использоваться для обмена данными
с периферийными USB-устройствами. Подключите периферийные USB-
устройства, а также USB-клавиатуру или USB-мышь к USB-концентратору, а
затем подсоедините USB-концентратор к портам USB-A.
2a
Подсоедините разъемы звука, DisplayPort и USB-A встроенных KVM-кабелей
к соответствующим портам на устанавливаемом компьютере.
2b
Подсоедините разъемы звука и USB-C встроенных KVM-кабелей к
соответствующим портам на устанавливаемом устройстве с USB-C.
3
(Дополнительно) Для получения питания от другого источника (напр., ПК,
USB-концентратора, USB-адаптера питания 5В пост. тока) подсоедините его
к порту питания Micro USB-B с помощью кабеля Micro USB-B.
Примечание: Кабель Micro USB-B не входит в комплект поставки.
Дополнительные сведения можно получить у местного поставщика.
C
Эксплуатация
Для переключения KVM-управления между двумя компьютерами используется
пульт удаленного переключения порта. Индикатор выбранного порта горит
зеленым.
www.aten.com
5
Разъем DisplayPort
6
Звуковые разъемы
7
Разъем USB-C
Interruttore KVM per cavo ibrido DisplayPort USB C a 2 porte CS52DP
A
Revisione Hardware
Vista laterale
1
Porta di alimentazione USB Micro-B
Vista dall'alto
1
LED della porta
2
porte console
3
selettore della porta remota
4
Connettore USB tipo A
B
Installazione
1
Connetti il mouse USB, la tastiera USB, lo schermo DisplayPort, microfono, e gli
altoparlanti alle loro rispettive porte sul CS52DP.
Nota: Le porte USB di tipo A si possono usare per condividere periferiche USB.
Connetti le periferiche USB e la tastiera USB o il mouse USB a un hub USB, e poi
connetti il hub USB a una delle porte USB di tipo A.
2a
Attacca i connettori DisplayPort, USB di tipo A, e audio dei cavi KVM inclusi alle loro
rispettive porte sul computer che stai installando.
2b
Attacca i connettori USB-C e audio dei cavi KVM inclusi alle loro rispettive porte del
dispositivo USB-C che stai installando.
3
(Facoltativo) Attacca un cavo USB Micro-B alla porta di alimentazione USB Micro-B
per alimentare da un’altra fonte USB (per esempio un PC, un bivio USB, un
adattatore DC 5V USB).
Nota: Il cavo USB Micro-B non è compreso nella confezione. Per ulteriori
informazioni contatta il tuo rivenditore locale.
C
Funzionamento
Premi il selettore della porta remota per far passare il controllo KVM da un computer
all’altro. La porta LED per la porta selezionata si illumina di verde.
www.aten.com
5
Connettore DisplayPort
6
connettori audio
7
Connettore USB-C
Conmutador KVM de cable híbrido DisplayPort USB-C de 2 puertos CS52DP
A
Revisión del hardware
Vista lateral
1
Puerto de alimentación USB Micro-B
Vista superior
1
LED de puerto
2
Puertos de consola
3
selector de puerto remoto
4
Conector USB Tipo-A
B
Instalación
1
Conecte el ratón USB, el teclado USB, el monitor DisplayPort, el micrófono y los
altavoces en sus respectivos puertos en el CS52DP.
Nota: Los puertos USB Tipo-A se pueden utilizar para compartir periféricos USB.
Conecte los periféricos USB y el teclado USB o el ratón USB en un concentrador
USB y luego conecte el concentrador USB en uno de los puertos USB Tipo-A.
2a
Enchufe los conectores DisplayPort, USB Tipo-A y de audio de los cables KVM
adjuntos en los respectivos puertos del ordenador que esté instalando.
2b
Enchufe los conectores USB-C y de audio de los cables KVM adjuntos en los
respectivos puertos del dispositivo USB-C que esté instalando.
3
(Opcional) Conecte un cable USB Micro-B al puerto de alimentación USB Micro-B
para obtener energía adicional de otra fuente de alimentación (es decir, PC,
concentrador USB o adaptador de corriente USB 5V CC).
Nota: El cable USB Micro-B no está incluido en este envase. Póngase en contacto
con su distribuidor local para obtener más información.
C
Funcionamiento
Pulse el selector de puerto remoto para cambiar el control KVM entre los dos
ordenadores. El LED del puerto seleccionado se ilumina en verde.
www.aten.com
5
Conector DisplayPort
6
conectores de audio
7
Conector USB-C
CS52DP 2-Port USB-C DisplayPort Hybrid Kabel KVM Switch
A
Hardware Übersicht
Seitenansicht
1
USB Micro-B Netzanschluss
Ansicht von oben
1
Anschluss LEDs
2
Konsolenanschlüsse
3
Remote-Port-Wähler
4
USB Typ-A Anschluss
B
Installation
1
Schließen Sie die USB-Maus, die USB-Tastatur, den DisplayPort Monitor, das Mikrofon
und die Lautsprecher an die entsprechenden Anschlüsse des CS52DP an.
Hinweis: Die USB Typ-A Anschlüsse können für USB-Peripherie-Freigabe verwendet
werden. Schließen Sie die USB-Peripheriegeräte und die USB-Tastatur oder USB-
Maus an einen USB-Hub an, und verbinden Sie den USB-Hub dann mit einem der
USB Typ-A Anschlüsse.
2a
Verbinden Sie die DisplayPort-, USB Typ-A- und Audio-Anschlüsse der
angeschlossenen KVM-Kabel mit den entsprechenden Anschlüssen am zu
installierenden Computer.
2b
Verbinden Sie die USB-C und Audio-Anschlüsse der angeschlossenen KVM-Kabel
mit den entsprechenden Anschlüssen am zu installierenden USB-C Gerät.
3
(Optional) Schließen Sie ein USB Micro-B Kabel an den USB Micro-B Stromanschluss
an, um eine zusätzliche Stromversorgung von einer anderen USB-Stromquelle zu
erhalten (z.B. PC, USB-Hub oder DC 5V USB-Netzteil).
Hinweis: Das USB Micro-B Kabel ist nicht im Lieferumfang enthalten. Bitte
kontaktieren Sie Ihren Händler vor Ort, um weitere Informationen zu erhalten.
C
Bedienung
Drücken Sie den Remote-Port-Wähler, um die KVM Steuerung zwischen den beiden
Computern umzuschalten. Die Anschluss-LED für den ausgewählten Anschluss leuchtet
grün.
www.aten.com
5
DisplayPort Anschluss
6
Audioanschlüsse
7
USB-C Anschluss
Commutateur KVM à câble hybride et DisplayPort USB-C 2-ports CS52DP
A
Présentation du matériel
Vue latérale
1
Port électrique USB micro-B
Vue de haut
1
LEDs de port
2
ports de console
3
Sélecteur de port à distance
4
Connecteur USB type-A
B
Installation
1
Connectez la souris USB, le clavier USB, l’écran à DisplayPort, le microphone et les
haut-parleurs dans leurs ports respectifs sur le CS52DP.
Remarque : Les ports USB type-A peuvent être utilisés pour le partage des appareils
USB. Connectez les appareils USB et le clavier USB ou la souris USB dans un hub
USB, puis connectez le hub USB dans un des ports USB type-A.
2a
Connectez les connecteurs DisplayPort, USB Type-A et audio des câbles KVM reliés
dans leurs ports respectifs sur l’ordinateur que vous installez.
2b
Connectez les connecteurs USB-C et audio des câbles KVM reliés dans leurs ports
respectifs sur l’appareil USB-C que vous installez.
3
(Facultatif) Connectez un câble USB Micro-B dans le port électrique USB Micro-B
pour obtenir une alimentation électrique supplémentaire depuis une autre source
électrique USB (comme un PC, un hub USB ou un adaptateur électrique USB 5V
CC).
Remarque : Le câble USB Micro-B n’est pas inclus dans l’emballage. Veuillez
contacter votre vendeur local pour plus d’informations.
C
Fonctionnement
Appuyer sur le sélecteur de port à distance pour faire basculer la commande KVM entre
les deux ordinateurs. La LED du port sélectionné s’allume en vert.
www.aten.com
5
Connecteur DisplayPort
6
Connecteurs audio
7
Connecteur USB-C
CS52DP 2-Port USB-C DisplayPort Hybrid Cable KVM Switch
A
Hardware Review
Side View
1
USB Micro-B power port
Top View
1
port LEDs
2
console ports
3
remote port selector
4
USB Type-A connector
B
Installation
1
Connect the USB mouse, USB keyboard, DisplayPort monitor, microphone, and
speakers into their respective ports on the CS52DP.
Note: The USB Type-A ports can be used for USB peripheral sharing. Connect the
USB peripherals and the USB keyboard or USB mouse into a USB hub, and then
connect the USB hub into one of the USB Type-A ports.
2a
Connect the DisplayPort, USB Type-A, and audio connectors of the attached KVM
cables into their respective ports on the computer that you are installing.
2b
Connect the USB-C and audio connectors of the attached KVM cables into their
respective ports on the USB-C device that you are installing.
3
(Optional) Connect a USB Micro-B cable into the USB Micro-B power port to get
additional power supply from another USB power source (i.e. PC, USB hub, or DC 5V
USB power adapter).
Note: The USB Micro-B cable is not included in the package. Please contact your
local dealer for more information.
C
Operation
Press the remote port selector to switch KVM control between the two computers. The
port LED for the selected port lights green.
www.aten.com
5
DisplayPort connector
6
audio connectors
7
USB-C connector

Chatta con il manuale del tuo ATEN CS52DP utilizzando l'IA

Ottieni risposte istantanee dall'IA dal manuale del tuo ATEN CS52DP

Chiedi qualsiasi cosa sul ATEN CS52DP. Le risposte provengono da questo manuale, con le pagine di riferimento.

Fai una Domanda

0/1000

Consigli CS52DP?

Sì No

Domande frequenti

A

It controls two separate computers from a single set of peripherals, allowing you to toggle between them quickly.

Questa risposta è utile?

A

Press the remote port selector located on the front panel to toggle control instantly between the connected systems.

Questa risposta è utile?

A

The front panel features console ports, audio connectors, and a remote port selector with LED indicators for status.

Questa risposta è utile?

A

No, the Micro-B power cable is not included in the standard package, so you may need to source it separately.

Questa risposta è utile?

A

Yes, you can connect additional devices to a USB hub and link that hub to the USB Type-A ports for sharing.

Questa risposta è utile?

A

The LED indicator for the selected port glows green to provide visual confirmation of the active connection.

Questa risposta è utile?

A

Yes, all connected devices should be properly grounded to prevent damage from static electricity or power surges.

Questa risposta è utile?

M: QW-35-FL

Vantaggi e Svantaggi

Vantaggi

  • Supports both DisplayPort and USB-C inputs seamlessly for versatile connectivity.
  • Includes audio connectors for microphone and speakers sharing across machines.
  • Easy switching with remote port selector and visual green LED indicators.
  • USB Type-A ports allow for USB peripheral hub sharing for printers and drives.
  • Consolidates workspace by using single keyboard and monitor setup for two PCs.
VS

Svantaggi

  • Micro-B power cable is not included in the package box with the unit.
  • Requires specific hybrid cables for DisplayPort and USB-C devices to work.
  • Limited to only two computer systems for control sharing at one time.
  • Needs proper grounding to prevent damage from static electricity or surges.
  • Remote port selector might require reaching if the unit is mounted far away.
M: QW-35-FL

Prodotto Specifiche

Tipo

Commutatore KVM

Porte

2 (1x DisplayPort 1.2, 1x USB-C)

Schermo

DisplayPort 1.2

Tastiera/Mouse

2x USB-A

Audio

2x 3,5mm Jack Audio

Rete

Non applicabile

Risoluzione

4096x2160@60Hz

Commutazione

Cablato (Pulsante remoto)

M: QW-35-FL

Descrizione del prodotto Descrizione

Enhance Multi-Computer Productivity with the ATEN Device

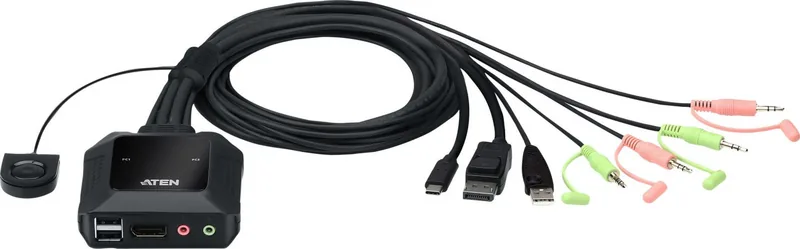
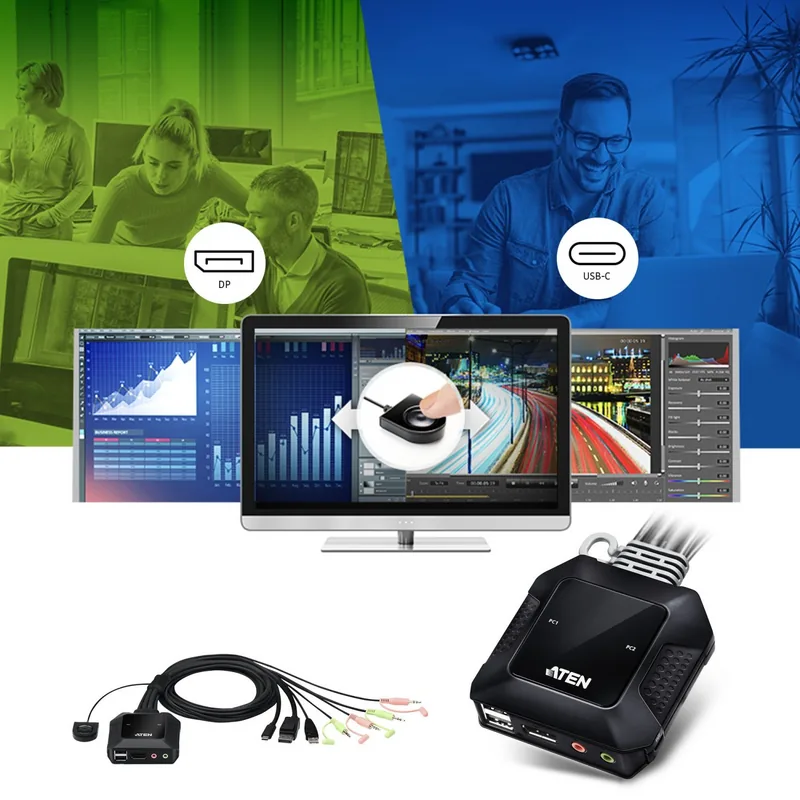
In today's fast-paced digital environment, managing multiple devices without clutter is essential. The ATEN 2-Port USB-C DisplayPort Hybrid Cable KVM-Switch offers a sleek solution for users needing seamless control over two separate computers from a single set of peripherals. Whether you are a professional developer managing code on different machines or a home office enthusiast juggling work and personal systems, this switch consolidates your workspace efficiently. It stands out as a versatile tool designed to simplify complex setups significantly.

Seamless Connectivity Standards

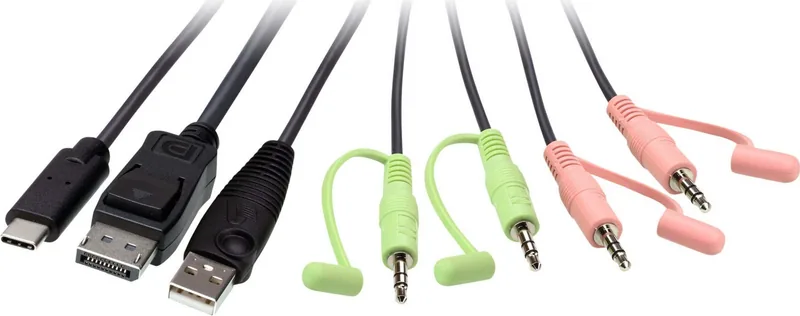
This device connects directly to your system units using hybrid cables that support multiple signal types efficiently. One side utilizes DisplayPort, USB-A, and audio for standard computers, while the other supports high-speed USB-C for modern laptops and docking stations. Audio connectivity is fully integrated, allowing you to share speakers and microphones across both systems without disconnecting physical cables. You simply have one monitor, keyboard, and mouse, and the switch handles the routing logic for you perfectly. This ensures your desk remains clean and tidy.

Advanced Features and Installation

Setup is straightforward once you understand the port layout clearly. You connect your monitor, keyboard, mouse, and audio equipment to the console ports on the face of the unit. Crucially, the USB Type-A ports allow for peripheral sharing beyond just keyboards. You can connect additional devices like printers or drives to a USB hub and link that hub to the port to share them between machines. For optimal performance, especially with power-hungry USB-C devices, connecting an external power source via the Micro-B port is highly recommended.

Safety Considerations

For safety, ensure all connected devices are properly grounded to avoid damage from static electricity or power surges. This is critical for preventing electrical issues during operation. Switching between systems is intuitive and rapid for the end user. A remote port selector located on the front panel allows you to toggle control instantly. When a specific port is active, the corresponding LED indicator glows green, providing clear visual confirmation. This eliminates the guesswork and saves valuable time when transitioning between tasks or testing environments effectively.

Implementation Notes

Ensure proper ventilation around the unit. Do not stack other items on top of the housing to avoid overheating. The power adapter requires a stable 5V DC connection for best results. Check cables regularly for wear or damage. Secure all connections to prevent loose signals.

Conclusion on Efficiency

By reducing cable clutter and enhancing efficiency, this KVM switch proves its value in any professional setup today. It supports various legacy and modern connection standards while maintaining audio fidelity and performance. Experience smooth workflow management and prioritize performance with this robust hardware solution. It is ideal for users seeking a reliable bridge between disparate computing platforms who need stability.

M: QW-35-FL

© Copyright 2026 Manual.ly